
Doppler Rolls
A Doppler Roll is a move that looks complicated, but is quite simple (assuming you've mastered the individual steps). They usually aren't a trick by themselves, but I use them in a trick called The Doppler Effect. Since The Doppler Effect is quite long, I am breaking it down to its components, and this is one of the major components of it. However, if you want to (as these instructions show), this part of the trick can be done over and over like Barrel Rolls. The only problem with this roll is that it is quite long so you probably wont want to repeat it too many times.
Step 1 - Split Bottom Mount
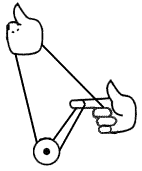 |
Start with a Split Bottom Mount. If you don't know how to do this, check Ken's World On A String |
Step 2 - Chain Reaction
| The next 6 steps form a move called a "Chain Reaction." This move is shown at Ken's World as well. It would probably be easier to learn from there, so go there now if you don't know it. I will only describe it briefly here. First, You are going to move your left hand behind your right as indicated by the blue arrow. As you do this, the yo-yo will be flipped in the direction of the orange arrow. | 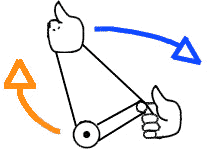 |
Step 3 - Chain Reaction
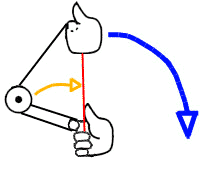 |
As you are moving your left hand behind your right hand, from Step 2, the yo-yo will eventually jump onto the red string. Continue moving your left hand backwards and down. |
Step 4 - Chain Reaction
| Now you should be in something similar to this position. Do an underpass with the left hand as indicated by the blue arrow. |  |
Step 5 - Chain Reaction
 |
You are still doing the underpass... continue moving until your hand reaches the blue X, then stop. |
Step 6 - Chain Reaction
| You should be in the position to the right. Push your left hand against the strings that are hanging from the right hand to the yo-yo and proceed to Step 7. |  |
Step 7 - Chain Reaction
 |
Now, do a somersault by moving your hand in the direction of the blue arrows until you reach the blue X. The yo-yo will continue to travel until it reaches the orange X because of the momentum from the push. |
Step 8 - Split Bottom Mount
| You will now be back in a standard split bottom mount. Quickly, so you still are using the momentum of Step 8, move your hand in the direction of the blue arrow so you end up at Step 9. |  |
Step 9 - Somersault
 |
Do a somersault. Again, move your hand in the direction of
the blue arrows toward the X, and the yo-yo will follow its path around
back to a spit bottom mount.
You can do more than one somersault here. I usually do two. If you do two, just make sure your hands end up in a split mount position when you are done. |
Step 10 - Split Bottom Mount
| You will be here again. Look familiar? :)
It's now time to go into a Mach 5 |
 |
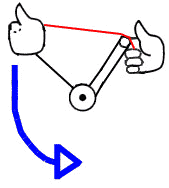
Step 11 - Mach 5
| Move your left hand
down and away from your body. This is standard procedure for an underpass
used in tricks like Atomic Bomb/Atomic Smasher, however you want to go
farther out in this trick than you normally would. Going farther important
as you will see in the next step. The red string in the picture is to show
you that it is coming from your yo-yo finger and going over the
pointer finger of your left hand.
Continue moving your left hand in the direction of the blue arrow as you proceed to Step 3. |
 |
Step 12 - Mach 5
 |
After following the arrow of Step 11, you should arrive in
the position shown to the left. Note how low your underpass is (this part
may be tricky if you cannot aim your strings). It is ideal to have the
yo-yo in the center of the strings coming from both hands. If not, your
hovering yo-yo (later on) will be off center and look rather ugly! The red
string (its one long piece with a piece hidden between the yo-yo) in the
picture is to simplify the image so you can tell one string segment from
the others (it also happens to be the same red string as Step 11 - but do
not assume all red strings in these instructions are the same string; they
are never the same unless I say).
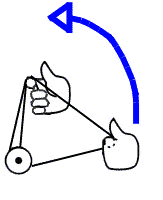
Follow the blue arrow (you are still carrying out your underpass) with your left hand. If you are not familiar with underpasses, the transition from Step 2 to 3 (and beyond) is done in one swift circular-resembling motion; you should not stop in-between steps when performing. |
Step 13 - Mach 5
| If you followed the arrow correctly you will be in the position to the right. Continue moving your left hand (remember, the left hand in this picture is the one that is facing away) in the direction of the blue arrow. Do not move your right hand. |
 |
Step 14 - Mach 5
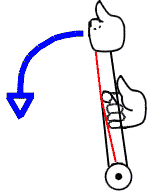 |
If you followed the blue arrow and did not move your right
hand, you will end up in the position to the left. The red string is used
to clarify the picture and should be on the outside (the part farthest
from you) of your pointer finger on your right hand. You have successfully
completed the first underpass.
Observe that your right hand is about half way between the left hand and the yo-yo and move on to Step 15. |
Step 15 - Mach 5
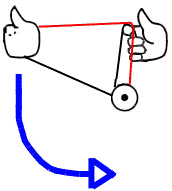
| The red line in this picture is not the same red line as in step 14, so do not get confused. The red string is just clarifying the view and is not important to this step. Continue moving your left hand in the direction of the blue arrow while keeping your right hand stationary. |
 |
Step 16 - Mach 5
 |
After following the above steps correctly you will arrive in
the position to the left. The red string segment, again, is only used to
help clarify the situation and is not the same as the red string segment
in any of the other steps. Now, if you straighten out the picture to the
left (by making the strings tighter - just pull up with your right hand
and down with the left) you will get the position to the right.
As seen in the picture to the right, move both hands simultaneously in the direction of the arrows. It is important that when you move both hands, they are exactly across from each other! Note - This is why you wanted the yo-yo in the middle in Step 3, and your hand in the middle in Step 5. If they weren't your yo-yo may not be centered at this point! :) |
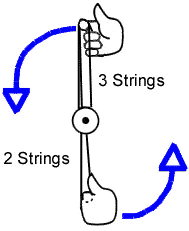 |
You are now in the stage of Mach 5 where the yo-yo is hovering and your hands are rotating!
Step 17 - Mach 5
 |
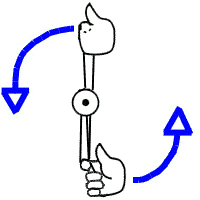
Your hands, after following the blue arrows in Step 8, should look "horizontal" as shown in the picture to the left. Continue moving both hands in the directions of their corresponding arrows, making sure to always keep them directly across from each other. Proceed to Step 18. |
Step 18 - Mach 5
| Continue following the arrows. At this point you will notice the string starting to loop around your right hand pointer finger. This is normal but be aware that if you continue rotating many many times then the string gets shorter and shorter. |
 |
Step 19 - Mach 5 Dismount
 |
After rotating as shown in Step 18, stop rotating. |
Step 20 - Mach 5 Dismount
| As soon as you stop in Step 19, the weight of the yo-yo will allow it to fall to the position shown to the right. |
 |
Step 21 - Mach 5 Dismount
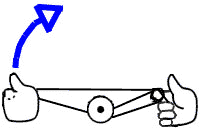 |
From the position in Step 20, also depicted to the left, follow the blue arrow with your left hand. |
Step 22 - Mach 5 Dismount
| You should now be in the position to the right. Follow that blue arrow with your left hand! At the end of this step, it should be somewhere near that blue X. Don't stop at that X, proceed to Step 23. |  |
Step 23 - Mach 5 Dismount (Underpass)
 |
You should be in this position. It's time to do another underpass with the left hand. Do so by following the blue arrow with the left hand. |
Step 24 - Mach 5 Dismount (Underpass)
| Now, finish the underpass by following the blue arrow up
until you reach the blue X. Now guess what? You may now return to Step
2 and repeat! Whoo hoo! Since this roll is much longer than, say,
Barrel Rolls or Pharaoh Rolls, you will probably only be able to do this
roll no more than 3 times.
|
 |