
Spirit Bomb was created by Jeff Longoria, and was one of the main influences of bucket-style string tricks. Few bucket-style tricks existed before this, and few had such difficult moves (pop-ups). Spirit Bomb is named after a move on Dragon Ball Z.
This trick is very difficult to describe, even with pictures. To help explain it, I have utilized two separate views. One is as if you were looking in a mirror, as normal, but the new view is an semi-overhead view, as if you were looking down on it from about a 3/4 angle.
Step 1 - Wrist Mount
 |
This wrist mount is used in a lot of new
moves, so it is good to learn. Basically you are going to throw a double
or nothing, but have it wrap around completely different fingers and land
on a different string.
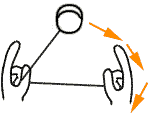
The first step is to throw the double or nothing motion, but the first finger it goes around is the left thumb. The yo-yo will now continue around the right wrist. |
Step 2 - Wrist Mount
| Next, make it go around your left hand pointer finger. The picture doesn't show this because I couldn't really draw the arrows without the hand getting in the way. |  |
Step 3 - Wrist Mount
 |
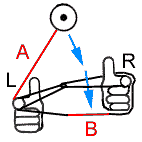
Now, after it goes around the left pointer finger, you want to land it in between the triangle formation caused by the strings and your right hand -- as the picture indicates with the orange arrow. The yo-yo will land on the red string.. |
Step 4- Wrist Mount, Drop
| Your string formation more or less should look like this. It
sort of looks like a bucket, and actually the formation is basically the
same as a bucket with a twisted string going to the yo-yo (although you
can' tell by the picture).
Drop every string off of your left hand (green arrow). |
 |
Step 5 - 1 Hand
 |
Everything now will be hanging off of your right hand wrist. |
View switch
| We are now going to switch views. Basically this is what you would see if you were looking into a mirror. |  |
Step 6 - Underpass
 |
Next, your right hand will go under your left and pluck the red string as shown in the picture to the left. You are going to do an underpass in the clockwise direction (if you pluck the right string that's the only direction you can go). Just follow the orange arrows. After the underpass, you will be at Step 7 |
Step 7 - Dunk
| Hopefully now (since you are attempting this trick) you will
be familiar with a move called a dunk. This move is used in tricks like
Ripcord and Wormhole, so if you do not understand how I get from this step
to the next, you want want to check out those tricks.
You will now perform a dunk by moving your left hand in the direction of the blue arrows. You will hit both of the red string segments, and the yo-yo will flip around your finger (when you hit the strings) and land on both string segments as well (this is the dunk). |
 |
Step 8 - Pop-up
 |
This is the first of two pop ups. Pop the yo-yo up in the air, and make sure it hits the red string, as indicated by the red string and orange arrow. The blue arrows in this step just show that you are tossing your hands up to pop the yo-yo up. |
Step 9 - Pop-up
| When the yo-yo is in the air, since it hit the red string segment in Step 8 (which is not the same red string in this picture), your formation should look like the one to the right. You are now going to cross your hands, left over right, and when you do, make sure you move in the direction of the blue arrow, and hit the red string with your pointer finger. |  |
Step 10 - Landing the Pop-up
 |
After you hit the red string in Step 9, continue switching the positions of your left and right hands as shown by the blue arrows. This will put your arms/hands crossed at the same horizontal level. |
Step 11 - Landing the Pop-up
| Once your hands are parallel, the yo-yo will fall down into the middle of your strings as shown by the orange arrows. It will probably land where all the strings meet (where its red). |  |
Step 12 - The Second Pop-up
 |
If your yo-yo's gap isn't big enough, the yo-yo may catch
here.
Now, you are going to sort of reverse what you just did. Pop the yo-yo straight up, but do not hit the string that is running between your left and right hands. |
Step 13 - The Second Pop-up
| If you popped the yo-yo up right, and didn't hit the top string, you will be in this airborne position for a split second. Start to uncross your hands by following the blue arrow with your left hand. Your left hand pointer finger will hit the red string segment. |  |
Step 14 - Landing the Second Pop-up
 |
Continue to uncross your hands, making sure you hit the red string segment with your finger as you uncross. |
Step 15 - Landing the Second Pop-up
 |
You just hit string segment A in Step 14
Now you will be this airborne position temporarily. The yo-yo has to land in the triangle formation formed by the string coming from your right hand, and when it loops back around your right wrist. Hope that makes sense. This path is indicated by the blue arrow. If not, just realize it has to land on red string segment B. |
 |
| Normal View |
Overhead View |
We will now switch back to the 3/4 overhead view.
Step 16 - New complex hold, drop
 |
This is how your new hold should be. It's almost the same as the the one you landed in the Wrist Mount. The only real difference will be a bigger "knot" looking thin in the center, and that everything is around your left pointer and not your thumb. Although there is no indication in this picture, you must now drop all strings off of your left hand pointer finger |
Step 17 - Dismount
|
|
Paul Escolar created this dismount. Just mentioning that
because he always tell Jeff to stop using his dismount, hehe.
After dropping the strings off of your left hand, you will be back in this position again. We will now switch back to the normal, mirror view of the picture to the left. |
|
Step 18 - Dismount
|
You are now going to pluck the red string segment with your right hand, like you did before. Then perform an underpass following the orange arrows. |
Step 19 - Dismount
| You will now be in this position once again. Here is the
tricky part to explain that is near impossible to draw, so you will have
to read this carefully. You are going to perform a dunk, like in Step 7.
This time, however you will not land the yo-yo on both strings.
The yo-yo will only land on the red string segment. The yo-yo will not
land on the green string segment.
This is easier than it may seem, because the red string is a little closer to you than the green is. |
 |
Step 20 - Dismount
 |
After the dunk on only the red string. You will now drop the segments farthest away from you on your left pointer finger. Also drop the string off of your right wrist. This is what those green arrows indicate. |
Step 21 - Trapeze!
| You will now be back in a trapeze. Kinda weird how that big mess disappears, leaving you with a simple Trapeze. Now end the trick with whatever you like, but it looks best with a Ferris Wheel dismount. | 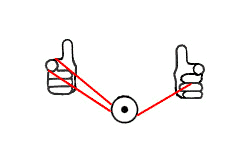 |